I sat observing a music teacher teach a song. As she said, “Come on just one more time and you guys will have it,” the kids rolled their eyes. It was only the 6th or 7th time she had said “one more time.” Although she was much older and had much wisdom to share, she didn’t know how to teach creatively with repetitiveness (but then again, neither did I at that time). I vowed to myself to be a more creative teacher where repetitiveness was concerned. Those kids were done and she was losing control of them. I decided I would find ways to accomplish the repetitiveness of teaching a song but to do it in ways that the students wouldn’t realize we were doing the same thing over and over again.
When we teach a song, there are obvious parts we must teach: words, rhythm, pitch, and dynamics, just to name a few. These things are only taught by repetition. Repetition can be very boring, but not if we get creative. Let’s look at some ways to teach each of these concepts repetitively but never the same way.
1. Words
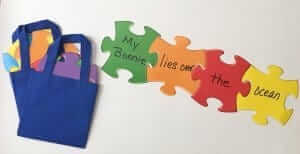
Lyric races are always fun. Simply print the lyrics fairly large on a sheet of paper or write them on die-cut shapes. One set is needed for each group that will race. Give each group a set of mixed up lyrics in a bag. On your “go”, they will dump the lyrics on the floor and see which team can put them in order the quickest. When that race is done, ask them to mix them up place them back in the bag and this time to place the lyrics in order backward. For the third race, choose a word from the middle of the section of words they have. Have them place that one word on the floor, then mix up the rest of the pieces and put them back in the bag. On your “go”, they will start with the word you had them keep out and the beginning words will go in order at the end as if you repeating the section. Last, have them sing the lyrics they have placed in order.
Sing through a verse or chorus in different voices. Students will never realize that they have repeated the lyrics four or five times. In some voices be aware that pitch is not the focus but rather the right words. This is always helpful when a song is wordy or contains a list.
Another idea is to divide children into teams. Give each team member one a word of the lyrics on a sheet of paper. Have the words all mixed up. On the word, “go” they must see who can get in the correct order first.
2. Rhythm
Rhythm activities are especially necessary if a song has a lot of syncopation. Put several rhythms from the song on a piece of cardstock. One rhythm per page. Scatter the rhythms on the floor. Place a team in a straight line on opposite sides, facing each other. Start with the first two students facing each other. Clap or say a rhythm from the collection on the floor. The first one to grab the correct rhythm earns a point for their team. Then go to the next team members facing each other and repeat.
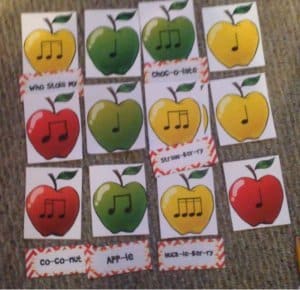
A personal favorite for teaching rhythm is to use rhythm words. Choose a set of fun rhythm words. For example; Pie for a quarter note. Ap-ple for 2 eighth notes. Choosing words surrounding a theme or holiday is easiest. Teach the rhythm by the fun words, then point out that is it very similar to a rhythm in a song you are learning. Next, lead the students to put the song lyrics to the rhythm and it will be cleaner.
This game Copyright 2014 Music Mom
Remote Control Singing. This is a great way to check your student’s internal steady beat. Use an old remote that has no batteries. On your direction, all begin singing. When you point the remote at the class and press the mute button, all should stop audibly singing, but continue singing in their minds. At some point, point the remote at the students and press the mute button again. All should begin audibly singing again. Where you all in the same spot? Regardless of the outcome, discuss the importance of watching the director so that we all stay together.
3. Pitch
Visual representation of pitch is an effective way to help children see what you would their voice to do. Using plates on a whiteboard or wall that visually represents the melody is a simple way to start. Of course, there is always solfege or the body scale to clean up large intervals. Placing intervals on the body helps to map pitches in the brain. There is no need to choose one or the other of these two because they complement each other and achieve different skill levels in our children. Use visual melody one day and place the pitches on the body the next time you teach the song.
Lead students to sing a section all legato or staccato. Then challenge them to change the style of their voice at your direction. Use stiff, choppy directing for staccato, and smooth, flowy directing for legato.
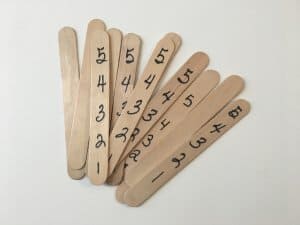
Lead students to move with the melody. Again using, solfege or the body scale, or numbers on a wall or a stick works really well here. Write numbers 1-8 or 1-5 on a jumbo craft stick. Take any section of the song that moves or jumps around a lot and apply scale numbers to the melody. Echo-sing with the students. For example; Sing 1,3,2,4,5 while touching the numbers on your stick to show how the melody moves up and down. Lead children to echo-sing the same melody while touching the scale numbers on their jumbo craft stick. (Tip: So that my class can clearly see the numbers I sing, I use a paint stick. They all use jumbo craft sticks.)
Have students draw the melody on a piece of paper. Then sing the song again moving their finger along the melody line they just drew. All should look similar, however, this is a great activity to make sure that students are making the correct visual connection to what they hear.
Put the melody on simple pitched instruments that the students can play. Pitch can get lost in tracks and the opportunity to hear simple, pure pitch will strengthen the ear.
4. Dynamics/Tempo
This is really fun. Use dynamic and tempo music symbols and words on a whiteboard or the wall. Lead students to sing through a section of the song, quietly and slowly. Then challenge them to do quiet and fast. Change the combination of dynamic and tempo words several times. Students are so focused on trying to do two things with their voice, they don’t realize that you have just had them sing the same chorus or section 6 times.
Use two very long pieces of yarn. Tape them together on one side of the room or have a student hold them. On the other side of the room, the two ends are taped far apart or have a student hold them far apart. This will create a giant crescendo. Start at the small end and lead students to begin singing, almost in a whisper voice. As you slowly move to the other end of the crescendo, their voices should gradually get louder. Flip the symbol around and lead students to decrescendo, or to start loud and gradually sing more quietly.
Challenge or Extension: Relate the decrescendo and crescendo to the size of your directing pattern. See if they can imagine where you might be standing by the size of pattern you are directing. Try different patterns and challenge students to sing the song again and make the volume of their voice match the size of your directing pattern.
Remember: Don’t be overwhelmed. You don’t have to implement all these techniques at one time. Choose one or two that you think might make a difference in your teaching, or maybe just add a little pizzazz. Once you are in the habit of teaching those techniques, come back and choose another. Continue learning, constantly making yourself a better teacher. Music should be fun to learn but it should also be fun to teach.